Environmental Sculpture Preparation Activities
Group Work involving; Jaz Kassis, Jamie Quinn and Lydia Sirriani
 Rowan leaves laid around Hole – Bright coloured leaves; Photographed October 25th 1987. Rowan leaves laid around Hole – Bright coloured leaves; Photographed October 25th 1987.
|

Name: (Unknown) - Materials: Sticks - Year: Unknown
|

Plane – Leaf Circle; Photographed November 1985
1. Identify the concept/theme he is attempting to explore within these sculptures.
The central theme that our group seems to be constantly inspired by is Andy’s works incorporating sticks and circles. We believe that the environment and the space used correctly suits the work and increases the energy it gives to the audience.
2. Explain why these sculptures work well within the site.
These sculpture all work well within the site because the site is the location where the materials were found. Because the materials are in their original environment it is evident how well the sculptures work within the site because of the originality Andy Goldsworthy is displaying to his audience of not disturbing his environment.
3. Discuss how your group might use one or more of these sculptures as inspiration for your own sculpture.
As an inspiration towards our sculpture our group would love to construct a similar idea using sticks as a halo and hand it around a certain environment against a tree to give our audience the message of being free and keeping the work natural.
STEP 3: IDEAS/ SELECTION
Produce THREE different design concepts that you may like to explore through your environmental sculpture.
1. An eye attached to a tree in the school front garden using leaves and found materials
2. A ‘dream catcher’ like design using sticks and plant leaves as rope
3. A pair of wings using large leaves and found materials

|

|
Name each of these design concepts and explain how you think you will go about exploring and creating these design concepts.
1. The eye was inspired by a shape in a tree that our group would have love to make more open and brighter to the audience. We wanted to attach leaves and pebbles to the eye to make it more visible but we are still unsure of how to stick them on the tree without using man made materials.
2. The dream catcher idea is a unique design where we wanted to use sticks to wrap around in a circle shape like a dream catcher using the leaves as ropes to secure the shape. But our group is still unsure how the sticks may be able to stay in place.
3. The wings idea is another idea of a beautiful shape to put on the ground of the school. Our group thinks it will be interesting to see the audiences’ reaction to the wings whether they will see it as something beautiful or a piece of junk.
 Final Concept:
This design is not only unique but it also represents freedom of reusing old materials that are dead and have fallen down. This design is also aesthetically pleasing and would appeal to the audience.
Final Concept:
This design is not only unique but it also represents freedom of reusing old materials that are dead and have fallen down. This design is also aesthetically pleasing and would appeal to the audience.
STEP 4: PLANNING AND PRODUCTION

The environment we have chosen to present our sculpture is in a tree in front of the canteen
To create our Dream Catcher we will need the following materials:
· Long/ thin sticks
· Dead weeds that can be used as rope
· Large and interesting looking leaves
Explain how your sculpture explores a theme similar to that of Goldsworthy.
Our sculpture explores a similar theme to Goldsworthy’s because we are using natural materials in its original environment and we a promoting the shapes that Goldsworthy used such as circles and the direction of the sticks.
Describe how your sculpture explores one of more of the six elements of Visual Arts (line, shape, form, space, value, texture).
Our sculpture explores the following elements of visual arts by:
Line – our artwork contrasts itself in the lines with the sticks facing a horizontal direction opposed to the pieces inside the circle that are facing a vertical direction.
Shape – the shapes that our artwork has promoted are similar to the shapes that Goldsworthy also promotes. We use sticks made in the shape of a circle to promote freedom and equality between all living things.
Space – Our artwork also enhances the space that we chose to use to display our work; because we are using mostly dead sticks and leaves when we hang the items back up on the tree where they originated from we are placing them back where they were once alive.
List the steps your group will follow to create the sculpture within the lesson time provided.
1. After the group has worked hard constructing the basic circle of the halo made of sticks it will be ready in time for the preparation day
2. On the preparation day there will be enough allocated time to make an extended rope to attach to the halo so that there will be enough rope to wrap around the tree
3. After enough rope is made we wrap around the tree the group will then proceed to the tree and wrap it securely around it and take photos of the process
4. After that the photos will then be transferred onto a laptop and the theory will begin
State how you intend to document your sculpture- during the physical making stages, the finished product and the decay of your sculpture. How do you intend to present your documentation?
I believe that the most informative and productive to document the product and decay of our sculpture using photos, this will not only document our research and production in detail but also to show the stages of our works and how it can change from one thing to another.
STEP 5: MAKING


STEP 6: ICT/ DOCUMENTATION


|


|
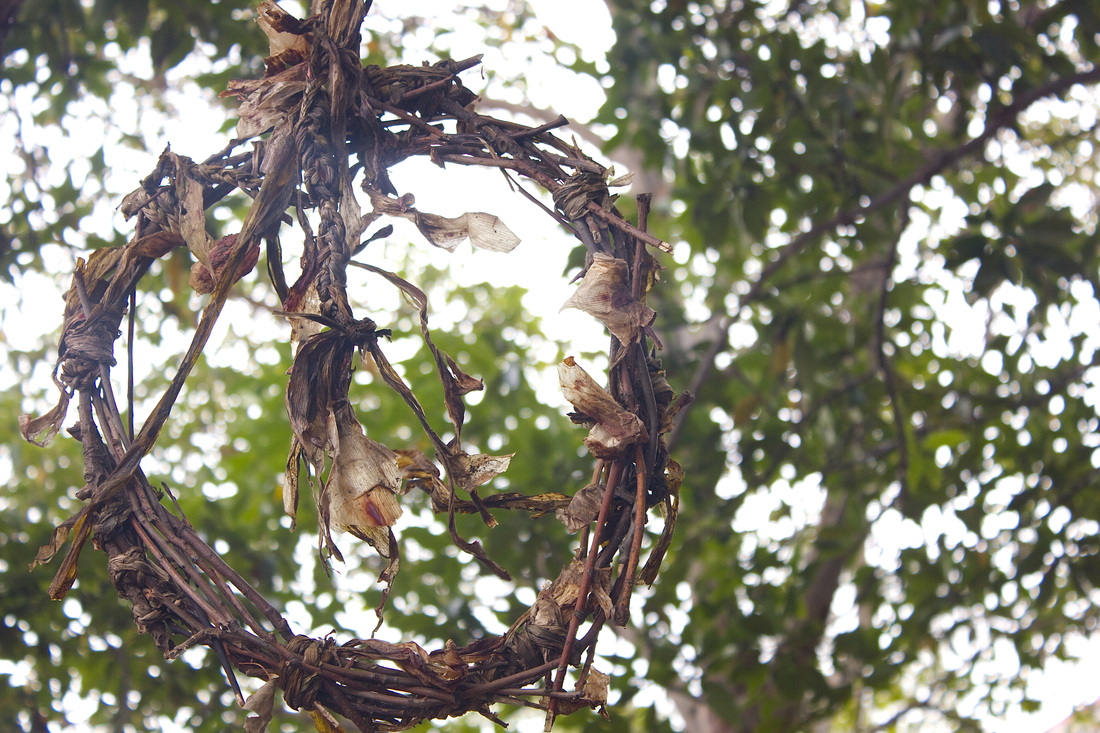
During the process of making the circle of sticks our group put the sticks in hot water to help them bend better. The technique worked very well and the sticks held in place
We found dead long leaves in the garden and found that when they were wet it was easier to plait together to make them stronger into rope that will be wrapped around the stick circle and keep them secure. 
|
STEP 8: EVALUATION
1. In our environmental sculpture we used the following materials…
We used sticks found on school grounds
Dead plants used as ropes
Water to soak the branches
2. We chose to use these materials because they symbolise the following ideas in the following ways…
These materials we incorporated, symbolise dead flora fallen from their original structural piece, as these branches fell from their original tree, and these dead plants fallen from the original plant.
3. We attached these materials together using…
The long leaf plants that we plated together to create ropes, this created a strong rope like material that we used to secure the sticks that were weaved together.
4. We chose to use the site we did because…
The tree is the source of our main material (branches) and we chose to put it back in its orginal place even though it had fallen naturally.
5. This site enhanced our ideas because…
It was a prime position that would show off our work to the school community as it was located in front of the canteen, which is a popular area at recess and lunch. It also shows where our materials came from.
6. In our design we used the following elements of Visual Arts (line, shape, form, space, value, texture)…
We definitely enhanced the lines, shape and texture in our work;
The lines of the ‘halo’ of sticks works in the same flowing direction as each other, this is what creates a sense of balance in the piece.
The shape of the circle also supports the balance of the piece because through the different lines and direction it still forms a shape making a tranquil/peaceful feel to the audience.
The texture of the piece also gives a peaceful and flowing feeling to the audience despite the range of textures the piece displays visually.
7. These elements can be seen in the following features…
These can be seen through the weaving of the sticks and the plating of the plants, as well as the tying of the plant leaves used as ropes as they form a circle despite the different direction the lines are pointing.
8. Our final sculpture changed from our original design concept in the following ways…
Our original design was based on the idea of a dream catcher, the base of our ideas (the circle of sticks) was successful but we felt as a group that the piece was already complete without the leaves attachd to the centre of the circle and the bottom of the circle – we believe though we changed it for the best by avoiding our piece looking too busy and taking it away from the design of the sticks.
9. What areas of the sculpture do you think work the best? Why?
I definitely believe that the use of our ‘rope’ worked the best for our piece. It had such detail and texture as well as giving the burst of colour with the red shade it gave off. It was also surprisingly strong, so it made the whole work run much easier then we thought.
10. If you had the opportunity to create the sculpture again, what areas of the sculpture would you attempt to improve? Why?
If I was to do the sculpture again I would love to have filmed to piece as it was taken up on the tree until the momement it decayed other than just taking photos. I believe especially for our unique design that it should be filmed to show how it slowly changed its shape through the rough weather conditions and the members of the school community reacting to it.
11. How do you think you could go around improving these features?
I could definitely take the time to leave the camera on record at recess and lunch everyday until our piece has fully decayed.
Documentation.
12. How do your photographs (and video) enhance the ideas you were exploring in your sculpture?
I believe our photos definitely enhanced our design and the ideas we wanted to explore with this unique piece- the photos appropriately enhanced the light and environment despite the poor weather conditions which made taking appropriate photos more challenging. Like the sculpture I believe that the photos are just as important as the sculpture and the group successfully fulfilled that task.
13. In what ways could these be improved?
I believe that the lighting could have been improved, I personally found it extremely challenging to photograph the sculpture the way I wanted without having the light as a major problem, as well as the rough wind, making it hard to take a focused photograph.
14. What were the challenges of working in a team?
The challenges of working in our particular team was defiantly avoiding distractions – our group was challenged by staying focused on the assigned task, as we sometimes would get off topic. Another challenge of working with a team, is deciding on an idea, it was hard for everyone to pick just one idea, as it always had pros and cons.
15. How could these be addressed (and eliminated) in the future?
Constant reminder to stay on task until hopefully this habit will gradually decrease could address these problems, and to pick an idea and just have a majority rule to it.
16. What were the positives of working in a team?
I definitely loved working in this group because each member of the group contributed immensely- the ideas that the members of our team collaborated and developed on was unlike any group I had ever been with. Each member of the team knew their job and worked on it which is why the production of our piece was so effective and finished on time despite the distractions. It was also great, as our team were comfortable with each other, so no one was afraid to bring up new ideas, and were comfortable expressing their opinions and thoughts on thoughts and ideas.
17. What strategies did you find helped promote positive working relationships and productivity when working collaboratively?
I definitely believed that assigning each person to one task during the production of our assessment worked effective. e.g.: Jamie and I, both collected materials and worked on the rope, while Jaz worked on the circle using sticks, and putting everything together to create the dream catcher itself, as well as Lydia who helped gathering materials and took photos.
18. How would you approach a collaborative task in the future?
I would defiantly approach a future collaborative task the same way I approach this one, by assigning each person a task that suits there skill set and give them that priority to get the task completed quicker.
